No products in the cart.
Is it common for users of your carefully developed Vue app to see an anxiety-inducing white screen or an endless loading loop when they open it? In this fast-paced era, users' patience is extremely limited.
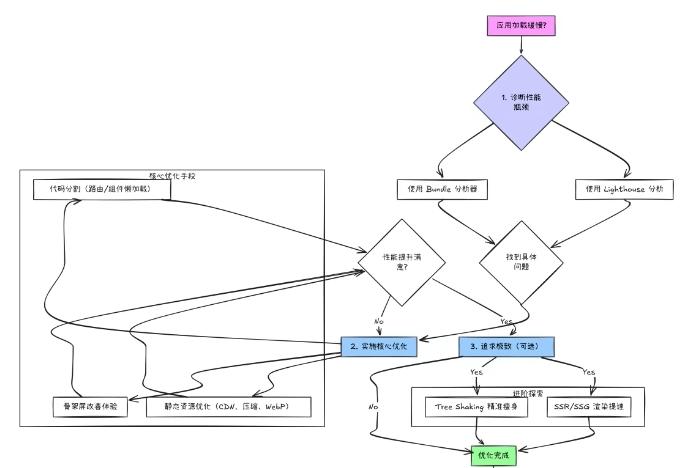
First of all, let's take a look at the optimization idea
Before we get started, let's use a chart to clear our minds and look at the overall steps of optimization:
.
Step 1: Uncovering performance “drags”
Before optimizing, you must pinpoint the problem.
- Lighthouse: your all-around performance checker This is a great tool that comes with Chrome (F12 opens Developer Tools -> Lighthouse). It simulates different environments, scores your page and tells you what's not working.
Focus on the FCP (First Content Painting) and LCP (Maximum Content Painting) times in the report. Ideally, the FCP should be less than 1.8 seconds and the LCP less than 2.5 seconds. Lighthouse will also tell you which JavaScript is taking too long to execute, which resources are blocking rendering, and so on.
1. Build the project: Run npm run build or yarn build. 2.
2. Preview locally: Start a local server with npx serve -s dist (assuming the build is in the dist directory). 3. Run analytics: Start a local server in Lighthouse.
3. Run analysis: In the Lighthouse panel, check “Performance” and click “Analyze page load”.
- Webpack Bundle Analyzer / Rollup Visualizer: See how big your “family” is Slow initial loads are often due to bloated packaged JavaScript files. You need to know which libraries or modules are the “size culprits”.
This “treasure map” allows you to clearly see the size of each module, and points the way for subsequent code splitting.
- Webpack project: Install webpack-bundle-analyzer ( npm i -D webpack-bundle-analyzer ), configure it in webpack.config.js. A visualization chart will automatically open after the build.
- Vite project: install rollup-plugin-visualizer ( npm i -D rollup-plugin-visualizer ), configured in vite.config.js. The stats.html file is generated after the build.
Step 2: Core Optimization
Diagnostics are done and the knives are starting to move. These are the most common and effective ways to improve the performance of the first screen:
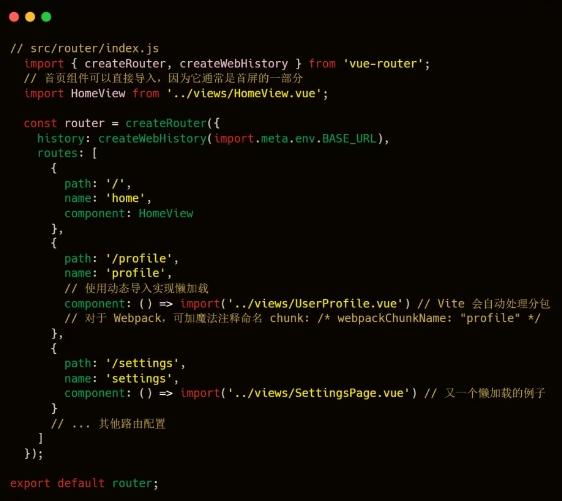
1. Code Splitting: Lighten up and load on demand This is the most important part of optimization. Don't make users download all the code for the entire app at once!
- Routing lazy loading: Utilize Vue Router's dynamic import() to have each page's code loaded only on access.
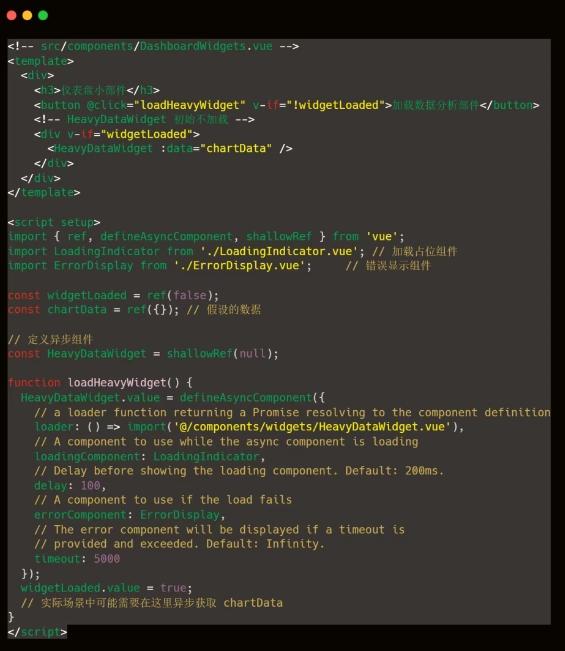
•Component-level dynamic import: Use defineAsyncComponent for components that are not required for the first screen but are bulky or displayed after interaction (e.g. charts, editors).
1. Static Resource Optimization: Giving Wings to Images, CSS, Libraries
- Embracing the CDN: Putting infrequent third-party libraries (Vue Family Bucket, Element Plus, ECharts, etc.) and built static resources (JS, CSS, images, fonts) on a CDN (Content Delivery Network). Users can load from the nearest node, dramatically reducing network latency.
- Configuration: In vite.config.js or vue.config.js (for Vue CLI) set base or publicPath to point to your CDN address. For library files, you can also configure externals (Webpack) or rollupOptions.output.globals (Vite) so that they are loaded from the CDN via <script> tags and not packaged into your business code.
- Extreme compression:
- Gzip/Brotli compression: Be sure to enable Gzip or Brotli compression (Brotli compression is higher) on your web server (Nginx/Apache) or CDN provider. You can also use plugins like vite-plugin-compression to pre-generate compressed files at build time. The size is easily reduced by 60% or more!
- Image slimming:
- Format preference: WebP format is mainly implemented, which is much smaller with minimal loss of image quality. JPG/PNG is available as a fallback for browsers that don't support it. AVIF format is more advanced and may have a higher compression rate, but compatibility should be kept in mind.
- Smart compression: Use tools like vite-plugin-imagemin to automatically compress images at build time.
- Responsive images: Use <picture> tag or srcset attribute to load different sizes of images according to the screen size, to avoid loading large images on small screen devices.
2. Skeleton Screen: Soothe the anxiety of waiting Show a rough outline of the page (gray placeholder) before the actual content loads to give the user the feeling that “the content is coming soon”. This won't shorten the actual loading time, but it will greatly improve the subjective experience.
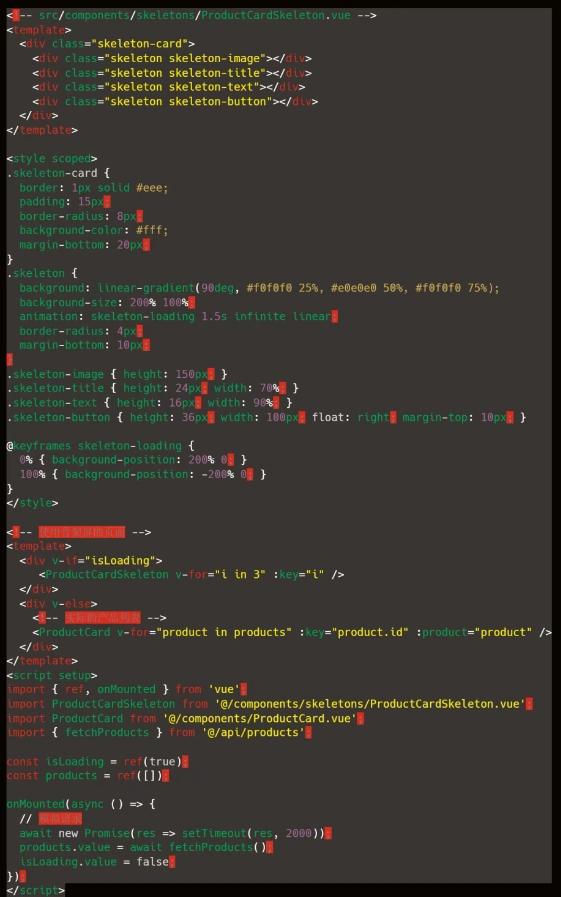
You can use vue-content-loader to generate an SVG skeleton screen, or you can implement it with CSS like above, which works just as well.
Step 3: Pursuing Extreme Performance (Optional)
If core optimization isn't enough, consider these “tricks”:
- Server Side Rendering (SSR) / Static Site Generation (SSG):
- SSR (e.g. Nuxt.js): Server renders HTML directly to the browser, first screen opens almost instantly! Opened almost instantly, extremely SEO friendly. Ideal for applications with highly dynamic content and high first screen and SEO requirements.
- SSG (e.g. VitePress, Nuxt static export): build time to generate static HTML. incredibly fast, suitable for documents, blogs and other infrequent changes in the content of the site.
- Prerendering: Generate static HTML at build time for a specific route (e.g. homepage) using tools such as vite-plugin-prerender. It's a compromise between SPA and SSG, and improves the first screen and SEO of some pages.
- Tree Shaking for precise thinning: Make sure your build tool (Vite/Webpack) is properly configured for tree shaking.
- Use the right libraries: e.g. lodash-es is better for tree shaking than lodash.
- Import on demand: Configure unplugin-vue-components and unplugin-auto-import (recommended by Vite) to automatically import component libraries on demand, or manually import { Button } from ‘element-plus’.
- Focus on side effects: Declare sideEffects correctly in package.json to help build tools remove useless code more efficiently.
Step 4: Quantify results and sustain guardianship
Optimization is not a one-shot deal. After each tweak, re-test the speed with Lighthouse and use the data to speak for itself. Set performance goals (e.g. FCP < 1.5s, LCP < 2s) and incorporate performance checks into the CI/CD process to prevent code iterations from slowing things down again.
In summary
First screen optimization for Vue applications is not out of reach. With diagnostics (Lighthouse, Bundle Analysis), core strategies (Code Segmentation, CDN, Compression, Skeleton Screens), and advanced solutions (SSR/SSG, Tree Shaking), your apps will be ready in seconds. Excellent performance itself is a strong competitive edge!

Aug 06, 2024

May 22, 2025

Aug 11, 2024

Mar 17, 2025

Aug 11, 2024

By clicking the button, you are agreeing with our Term & Conditions